- Overview
- Before You Start
- Step 1: Open Shopify in Your Chatbot Settings
- Step 2: Enter Your Shopify Domain
- Step 3: Authorize Shopify
- Step 4: Choose the Shopify Features You Want Enabled
- Step 5: Save the Shopify Settings
- Step 6: Copy the API Key from Deployment
- Step 7: Enable the Noem.ai Chatbot in Shopify
- What to Test Before Going Live
- Common Issues
- Recommended Rollout
Overview #
Connecting your Noem.ai chatbot to Shopify allows your chatbot to answer store questions with live Shopify data and support more purchase-ready conversations. Once connected, your bot can help customers browse products, check stock, look up orders, review cart contents, and answer store policy questions. Shopify connectivity is available on the Professional plan ($49.99 per account, billed monthly).
With the latest Shopify update, you can also enable optional commerce actions such as:
- Add to Cart
- Get Checkout Link
- Apply Discount Code
- Update Cart
- Store Policies
The release also adds a Show all product images as thumbnails setting for richer product cards, plus a Return/Refund action on order cards.
Before You Start #
Make sure you have:
- a Noem.ai workspace on the Professional plan
- admin access to your Shopify store
- the chatbot project you want to connect
- your Shopify store subdomain
- access to your active Shopify theme
You will also need to authorize Shopify inside Noem.ai and then paste your chatbot API key into the Noem.ai Shopify app embed in Shopify.
Step 1: Open Shopify in Your Chatbot Settings #
In Noem.ai:
- Go to My Projects
- Select the chatbot you want to connect
- Open Instructions
- Expand the Shopify section inside the “tools” button
This is where you start the Shopify connection.
Step 2: Enter Your Shopify Domain #
Enter only your Shopify subdomain.
If your store URL is:
yourstore.myshopify.com
enter only:
yourstore
Do not include https:// or .myshopify.com. This is required for the integration to work correctly.
Step 3: Authorize Shopify #
Click Auth inside the Shopify section to grant Noem.ai access to your Shopify store. Complete the authorization flow before moving on.
Step 4: Choose the Shopify Features You Want Enabled #
After authorization, decide what you want the chatbot to do.
Recommended starting point #
For most stores, start with support and product assistance:
- product search
- inventory checks
- order lookups
- cart recall
- policy answers
This gives you a useful storefront assistant without immediately allowing the bot to change the cart or influence checkout.
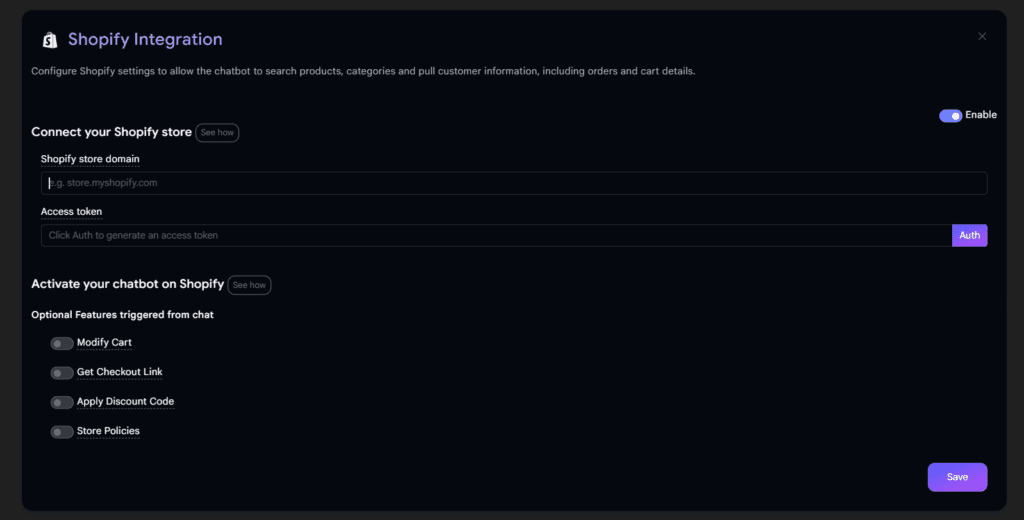
Optional commerce actions #
Enable these only if you want the chatbot to take more active purchase actions:
Add to Cart
Lets the chatbot add products to the customer’s cart. If a product has variants such as size or color, the bot should ask the customer to choose the correct one first.
Get Checkout Link
Lets the chatbot generate a direct checkout link for a specific product or variant.
Apply Discount Code
Lets the chatbot apply a promo code provided in chat to the customer’s current session.
Update Cart
Lets the chatbot change quantities or remove items from the cart.
Store Policies
Lets the chatbot answer refund, shipping, privacy, and related policy questions.
Visual browsing setting #
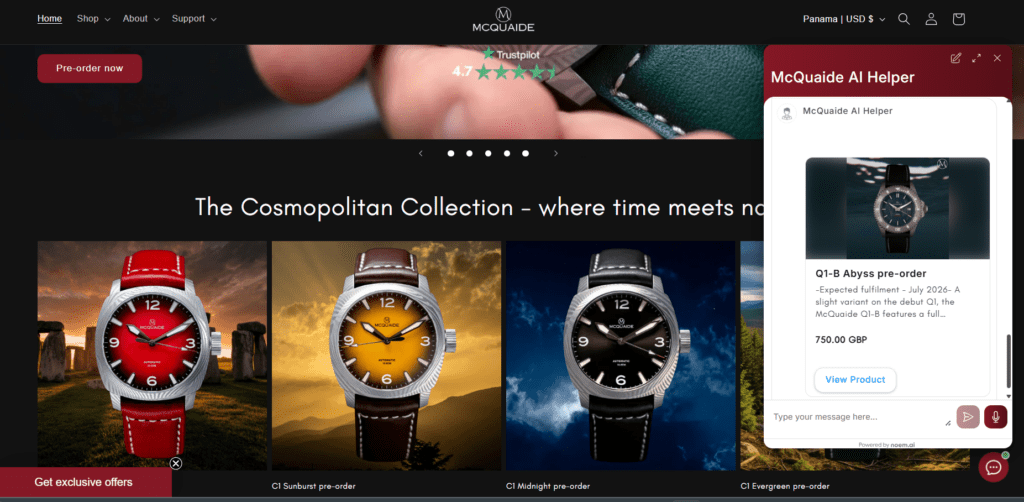
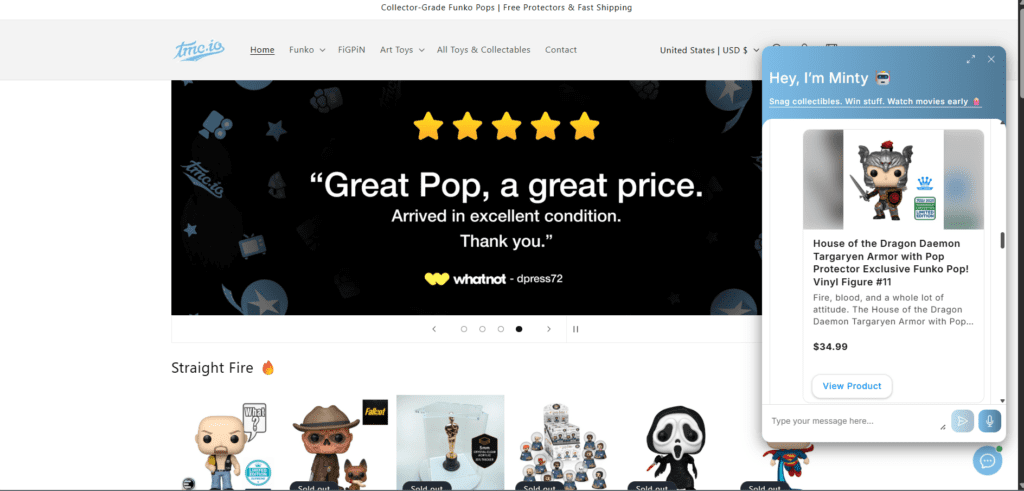
If you want richer product cards, turn on Show all product images as thumbnails. This adds a scrollable image strip below the main product image in chat.
Post-purchase support #
Order result cards can now include a Return/Refund action so customers can begin a return flow directly from chat.
Step 5: Save the Shopify Settings #
After selecting your Shopify options, save your settings in Noem.ai.
This matters because the deployment step depends on the Shopify connection already being configured.
Step 6: Copy the API Key from Deployment #
Open the chatbot’s Deployment tab and find the Shopify deployment area. Copy the chatbot’s API Key. You will paste this into Shopify in the next step.
Step 7: Enable the Noem.ai Chatbot in Shopify #
In Shopify Admin:
- Go to Sales Channels
- Open Online Store
- Go to Themes
- Click Customize on your active theme
- Open App embeds
- Search for Noem.ai Chatbot
- Enable it
- Paste the API key into the embed settings
- Save
Also make sure your Shopify domain appears under Approved Domains in Noem.ai. Once saved, the chatbot should load across your storefront pages.
What to Test Before Going Live #
Do not stop at checking whether the widget appears. Test the workflows your customers will actually use.
Product discovery #
Try:
- Show me black sneakers under $80
- Do you have a blue hoodie in medium?
The chatbot should return matching products, pricing, and links.
Inventory lookups #
Try:
- Do you have size 9 left in this shoe?
The chatbot should return current stock availability when inventory access is enabled.
Order support #
Try:
- Track order #1234
- Where is my order?
The chatbot should return fulfillment details and tracking information when available.
Cart recall #
Try:
- What’s in my cart?
The chatbot should list current cart contents and subtotal when cart access is enabled.
Optional commerce actions #
If you enabled them, test them directly:
- Add this to my cart
- Change quantity to 2
- Remove this item
- Apply code SAVE10
- Give me a checkout link for this product
Policies #
Try:
- What is your refund policy?
- What is your shipping policy?
Visual product browsing #
Open a product conversation and confirm that image thumbnails appear if you enabled Show all product images as thumbnails.
Return/refund flow #
Try:
- I want to return this item
- How do I get a refund?
Order cards should surface the Return/Refund action if that flow is enabled.
Common Issues #
The chatbot is not visible on the site #
Check that:
- the Noem.ai Chatbot app embed is enabled
- the API key was pasted correctly
- the active theme is the one you edited
- your Shopify domain is approved in Noem.ai
This is one of the most common setup issues.
The Shopify domain does not work #
Use only the subdomain. Do not enter the full store URL.
Product or inventory data is not loading #
Make sure the relevant Shopify inventory and order access settings are enabled and saved in Noem.ai.
Cart actions are not working #
Confirm that the related optional feature is actually turned on. For example, Add to Cart must be enabled for cart insertion, and Update Cart must be enabled for quantity changes or removals.
Recommended Rollout #
For most stores, the best rollout is:
Phase 1
Start with:
- product search
- inventory checks
- order support
- cart recall
- store policies
Phase 2
After testing, add:
- Add to Cart
- Get Checkout Link
- Apply Discount Code
- Update Cart
Phase 3
Refine:
- upsell behavior
- image thumbnails
- return/refund journeys
- escalation logic
This keeps the first launch safer and makes troubleshooting easier.


