
- What Is the Deploy Tab?
- Prerequisites
- Step-by-Step Guide
- Deployment Settings Reference
- Managing Updates
- Real-World Use-Cases
- Ready to Launch?
Use these instructions to publish your Noem AI chatbot on the digital property of your choice, from a website embed to WhatsApp, Slack, or an online store. All deployment options start in the Deploy tab inside your project.
What Is the Deploy Tab? #
The Deploy tab gathers every publish option for your bot: website scripts, CMS plugins, an online store integration, messaging-app connections, and a turnkey hosted page, plus a master list of Approved Domains that restrict where your API key is allowed to run.
- Fast go-live – Add one destination and you’re live in minutes.
- Central control – Enable, disable, or reconfigure any destination, or rotate keys, from a single console.
- Brand consistency – One bot definition powers web, mobile, and chat apps.
- Security – Requests are accepted only from domains you approve.
Prerequisites #
- An active Noem AI chatbot project and its API Key.
- Administrator access to your web property (website CMS, DNS, Facebook Developers, Slack API, etc.).
- Optional: User-profile data if you want personalized responses.
Step-by-Step Guide #
1. Open the Deploy Tab #
- Log in to your Noem AI account.
- From the top menu, go to My Projects.
- Click your chatbot, then select Deploy from the tab bar at the top of the project (Test, Instructions, Knowledge, Design, Inbox, Stats, Evals, Deploy, Settings).
2. AI Chatbot API Key #
An AI Chatbot API Key is a unique identifier that securely links your deployed chatbot to your Noem AI account. It acts like a digital access token that authorizes your website, app, or integration (such as WordPress or Shopify) to communicate with your specific bot. By entering this key into your plugin or embed configuration, Noem AI can verify your ownership, route conversations to the correct chatbot, and ensure that only approved domains or platforms can access your bot’s functionality.
3. Add Approved Domains #
Your bot will execute only on the domains listed here.
- In Approved Domains, click Add Domain.
- Enter each root or sub-domain (e.g., example.com, chat.example.com), or a wildcard such as *.example.com to cover every sub-domain at once.
- Optional: use Block on URL Path to restrict the bot to a specific section of your site, for example a Path Containing value like /support?ref=1#faq.
- Click Save.
4. Choose Where Your Chatbot Appears #
The Deploy tab lists every destination your chatbot is published to. Click + Add to connect a new one; each destination shows its own status, such as Setup in Progress, until you finish its configuration. WhatsApp Business, Slack, Twilio SMS, and the Hosted Chatbot Page described later in this article are all reached through this same + Add flow.
Website #
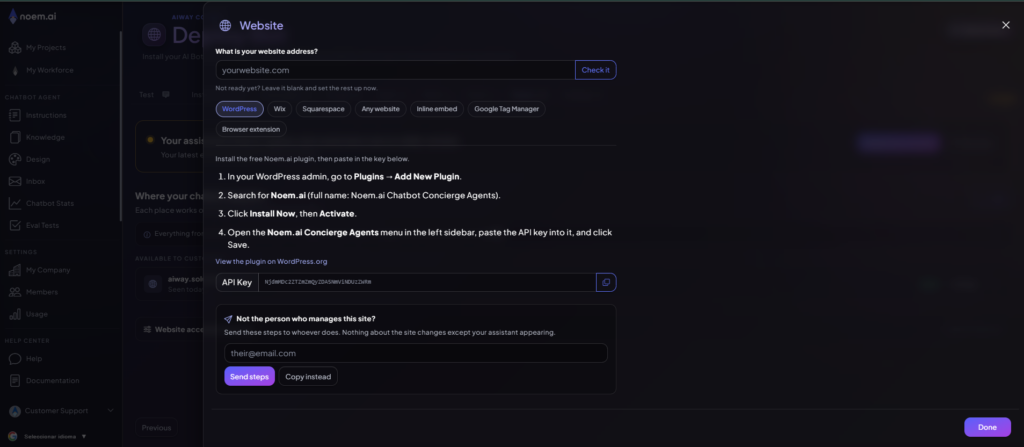
Choose Website from the + Add menu to open the website destination dialog. Use Check It to have Noem AI scan your URL and auto-detect your platform, or pick your platform manually from the tabs: WordPress, Wix, Squarespace, Any Website, Inline Embed, Google Tag Manager, and Browser Extension.
WordPress #
Install the official Noem AI plugin directly from your WordPress dashboard:
- In WordPress Admin, go to Plugins › Add New Plugin.
- Search for Noem.ai Chatbot Concierge Agents.
- Click Install Now, then Activate.
- Open the plugin’s settings, paste your API Key, and save.
- Add your site (e.g., mysite.com) to Approved Domains in Noem AI.
Check this article for more information: Install Your Noem AI Chatbot on WordPress
Wix #
From the Website dialog’s Wix tab, or directly in Wix:
- Sign in to Wix Studio and open your site.
- Settings › Custom Code › Add Custom Code.
- Paste the website script provided in the dialog.
- Name: NOEM-AI. Place Code in: Body – end.
- Add your domain to Approved Domains.
Check this article for more information: Install Your Noem AI Chatbot on Wix
Squarespace #
From the Website dialog’s Squarespace tab, or directly in Squarespace:
- In Squarespace: Settings › Developer Tools › Code Injection.
- Paste the website script into Footer.
- Save and publish.
- Add your domain to Approved Domains.
Check this article for more information: Install Your Noem AI Chatbot on Squarespace
Any Website #
For any HTML site not covered above, use the Any Website tab in the Website dialog and embed the bot with a script tag:
The snippet is a script tag pointing to “https://app.noem.ai/js/ChatBot.js”, followed by a short script that creates the chatbot and starts it.
At its simplest, that second script only needs two lines: const bot = new ChatBot(‘YOUR_API_KEY’); and bot.init();
You can optionally pass a current-user object (fields like userId, displayName, profilePic, email) to personalize the conversation, and an options object to customize the widget, for example inputMessagePlaceHolderText, disableCSS, and disableFabButton. You can also hook into events with bot.onMessageSent, bot.onMessageReceived, and bot.onEventTriggered if you want to log or react to conversation activity.
Replace YOUR_API_KEY with the key shown in Deploy › API Key.
- Paste the code into your website’s HTML file, just before the closing </body> tag.
- Save your changes and publish your website.
- Open your website in a browser and refresh; the Noem AI chatbot should now appear on your site.
Check this article for more information: Install Your Noem AI Chatbot on Any Website
Inline Embed #
Inline Embed renders the assistant directly inside an element on your page instead of the floating chat bubble, ideal for a dedicated support section or landing page.
- Add a container element with a unique ID where you want the chatbot to appear, for example <div id=”chatbot-container”></div>.
- Give the container a height in your CSS; without one it collapses to zero height.
- From the Website dialog’s Inline Embed tab, copy the provided script and paste it into your page just after the container.
- In the script, set ELEMENT_ID to the ID you used for the container.
- Save your changes and publish your website.
See Embed Your Noem AI Chatbot in a Specific Section of Your Website for the full walkthrough, including advanced and custom cases.
Google Tag Manager #
Use the Google Tag Manager tab in the Website dialog to deploy through GTM. See Google Tag Manager Integration later in this article for the tag configuration and event hooks.
Browser Extension #
Use the Browser Extension tab in the Website dialog to connect a browser extension install for testing or internal tools. For the extension installation walkthrough, see Test Your Noem AI Chatbot with the Chrome Extension.
Any destination dialog also offers Send Steps, which emails or copies the install instructions so you can hand them to a developer who doesn’t have admin access to your Noem AI account.
Online Store (Shopify / WooCommerce) #
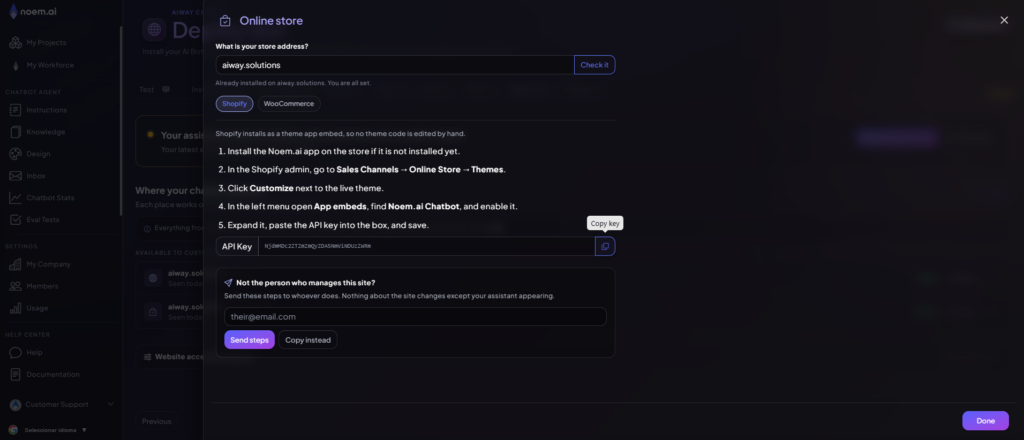
Choose Online Store from the + Add menu to connect a Shopify or WooCommerce storefront through a theme app embed. See Integrate Your AI Chatbot with Shopify or Integrate Your AI Chatbot with WooCommerce for platform-specific steps.
Hosted Chatbot Landing Page #
No site? Publish a branded, HTTPS-hosted page in minutes.
See Publish a Hosted Chatbot Landing Page for the full workflow.
WhatsApp Business #
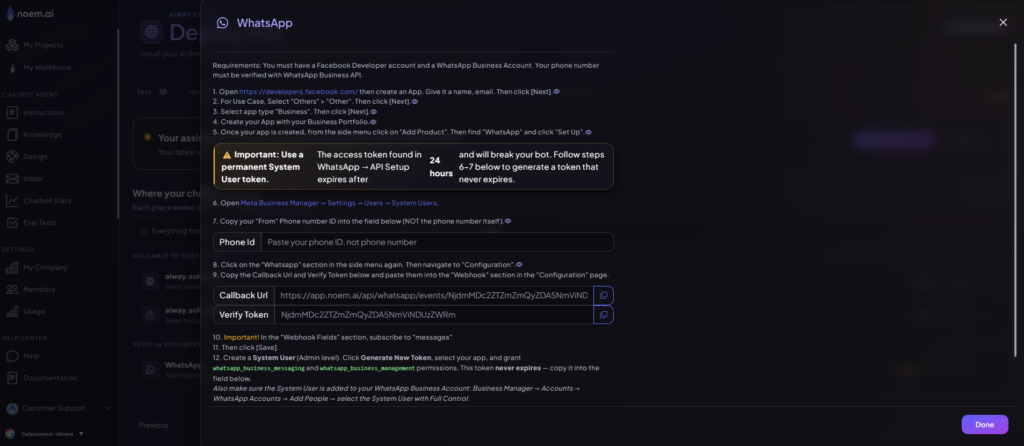
- Go to Meta Developers › create or open your WhatsApp App.
- Add a phone number.
- Configuration › Webhook – paste the Callback URL and Verify Token shown in Noem AI, then Verify and Save.
- Click Manage › subscribe to event messages.
- In API Setup, copy Access Token and Phone Number ID into Noem AI.
- Send a WhatsApp message to the From number to test.
Token is valid for 23 h in sandbox; follow the Permanent Token guide.
Slack #
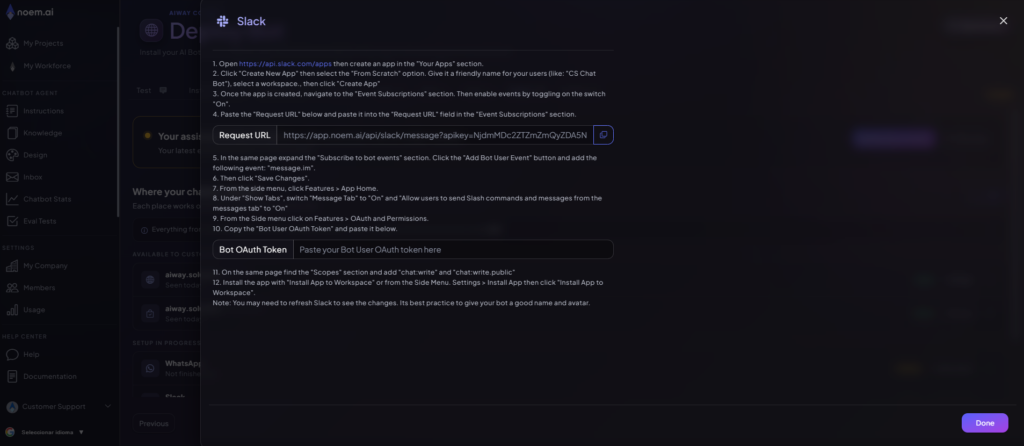
- Go to https://api.slack.com/apps › Create New App › From Scratch.
- Give it a name and pick a workspace.
- Event Subscriptions – toggle On and enter the Request URL provided by Noem AI.
- Under Subscribe to bot events add message.im.
- Save Changes.
- App Home – enable Message Tab and user posts.
- OAuth & Permissions – copy Bot User OAuth Token into Noem AI.
Add scopes chat:write and chat:write.public. - Install App to Workspace.
- Refresh Slack; the bot should appear with its configured name and avatar.
Check this Article for more information: Install Your Noem AI Chatbot on Slack
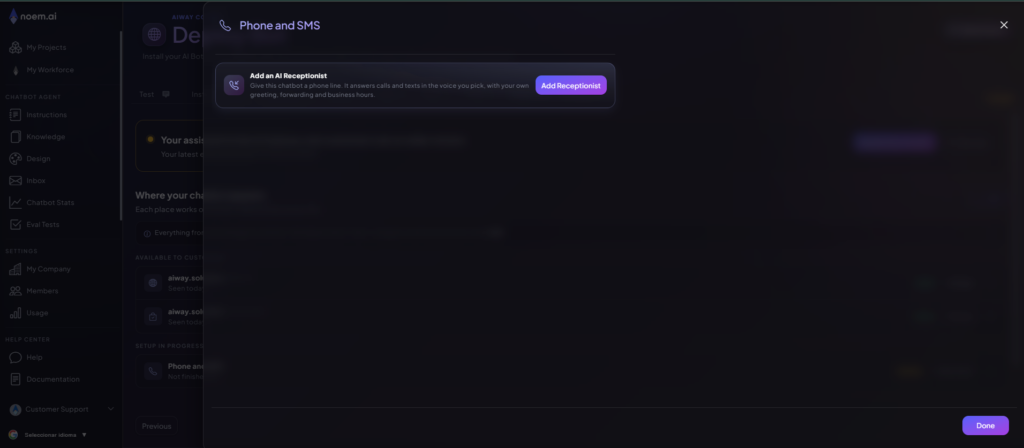
Phone and SMS #
- Buy a new number in Twilio.
- Complete A2P 10DLC or other regional compliance.
- Twilio Console › Develop › Phone Numbers › Active Numbers › select your number.
- Configure › Messaging Configuration – set Webhook URL (shown in Noem AI) and method HTTP POST.
- Save, then add your site (or Twilio SMS domain) to Approved Domains.
- Send an SMS to your Twilio number; the bot should respond.
Integrate Your Noem AI Chatbot with Twilio
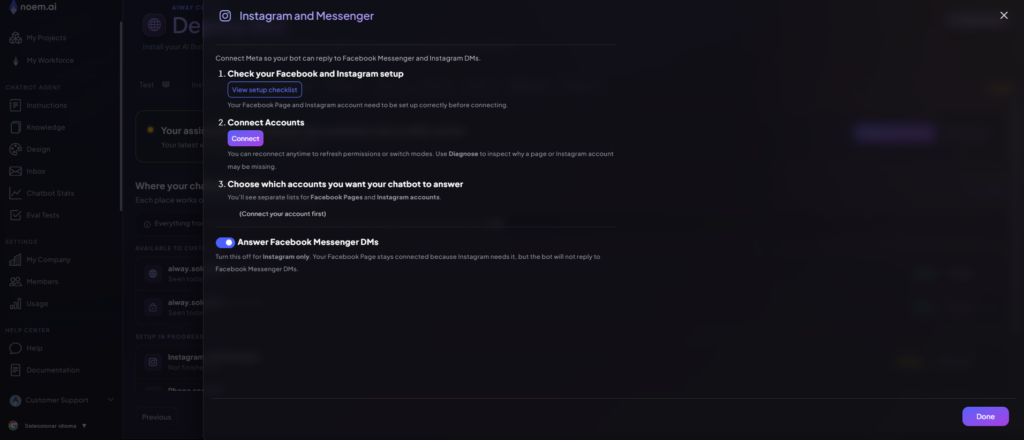
Facebook & Instagram #
- Go to Meta Business Suite and connect your Facebook Page and Instagram Professional account.
- In Noem AI, open Integrations › Facebook & Instagram and click Connect.
- Log in with the Facebook account that manages the Page.
- Select the Facebook Page and linked Instagram account.
- Grant all requested messaging permissions and complete the connection.
- Send a message to your Facebook Page and Instagram account to test both channels.
Google Tag Manager Integration #
The web embed automatically pushes events to GTM if GTM is already present.
To customise, override the hooks:
Override the onMessageSent and onMessageReceived hooks to push a custom event into dataLayer. Each call sends an event name, an eventCategory of Chatbot, an eventAction of messageSent or messageReceived, and a detail field containing the message itself.
(Works with the Website / JS integration only.)
Test with a Browser Extension #
From the Website dialog, choose the Browser Extension tab to connect an extension install for quick testing or internal tools, without adding a script to your live site.
For the full extension installation walkthrough, see Test Your Noem AI Chatbot with the Chrome Extension.
Embed in a Specific Section of Your Website #
Most sites should use the native Inline Embed option described under Website above; it covers placing the chatbot inside a page element with just a container ID and a script.
For advanced or custom layouts, such as targeting a section injected by a page builder or theme, see Embed Your Noem AI Chatbot in a Specific Section of Your Website for the full manual walkthrough.
Deployment Settings Reference #
API Key: A unique key that authorizes the bot. Keep this key secret to maintain security.
Approved Domains: The list of domains allowed to initialize the chatbot script.
Callback URL / Verify Token: Required for setting up webhooks with platforms like WhatsApp and Slack.
Webhook URL (Twilio): The endpoint that Twilio will call when it receives an incoming SMS.
nbOptions: UI customization options, such as placeholder text, custom CSS, and floating action button (FAB) settings.
Managing Updates #
- Rotate API Key – Deploy › Generate New Key, update every target.
- Add domains – update Approved Domains then Save & Publish.
- Shopify / WP plugin updates – update via each platform’s app/plugin manager.
- Twilio token or webhook change – edit number configuration in Twilio.
Real-World Use-Cases #
- E-commerce (Shopify) – product FAQ and upsell inside every product page.
- Customer-care hotline (Twilio SMS) – answer order-status requests over text.
- Marketing microsite (Hosted Page) – QR-code campaigns with zero hosting costs.
- Website lead capture (HTML / JS) – personalise greetings with current user data.
- Internal helpdesk (Slack) – HR policies and IT troubleshooting in-workspace.
Ready to Launch? #
Pick your deployment path, paste your API key or webhook, add your domain(s), and click Publish. Your Noem AI chatbot will be live, on web, mobile, SMS, or chat apps in minutes, with no server code required.


