
- Where to find it
- What the chatbot can do with your store
- Connecting your store
- Turning on individual features
- Display and catalog settings
- How this differs from Shopify
- Troubleshooting a store that will not connect
- Worked example: letting shoppers check stock before they ask to buy
- Worked example: quoting real reviews instead of guessing
- Tips
If your business sells through WooCommerce, your chatbot does not have to send visitors away to search your store. The WooCommerce integration lets your chatbot search your product catalog, check stock, quote real customer reviews, and even add items to a shopper’s cart, all from inside the conversation. This article covers what the integration can do, how to connect a store, and how to troubleshoot a store that will not connect.
This feature is currently in Beta and is gated by plan. If you do not see WooCommerce in your Tools panel, it may not be available on your plan yet.
Where to find it #
The WooCommerce integration lives in the Tools and Integrations panel, reachable from the Instructions tab of a chatbot project.
- Open your chatbot project.
- Go to the Instructions tab.
- In the toolbar above the editor, click the scissors and wrench icon labeled Tools.
- In the Tools and Integrations panel, click WooCommerce.
The Tools and Integrations panel lists every integration available to your chatbot. WooCommerce sits near the bottom of the list, marked Beta, separate from Shopify, which is listed higher up.
What the chatbot can do with your store #
Once connected, the chatbot can call eight WooCommerce functions during a conversation. You do not write these yourself, the chatbot decides when to call them based on what the shopper asks. They are visible in the Function Explorer, opened from the “fx” icon in the Instructions toolbar, by searching “woo”.
- wooFindProducts: searches the catalog by keyword, category, price range, sale status, stock status, or attributes like color and size. All parameters are optional, so the chatbot can also call it with none of them to browse the catalog for an open ended request like “what do you sell”.
- wooFindBySku: looks up a single product by its exact SKU or part number.
- wooGetCategories: lists the store’s product categories, including sub-categories and how many products are in each, useful for helping a shopper browse or for finding the right category name before a category search.
- wooGetCategoryProducts: shows the products inside one specific category.
- wooGetProductReviews: returns real, published customer reviews and star ratings for a product. The chatbot is instructed to never invent or paraphrase a review that was not actually returned.
- wooGetTopRated: returns the store’s highest rated products, optionally within a category, for questions like “what do you recommend” or “what is popular”.
- wooAddToCart: adds a product to the shopper’s cart, or gives them a direct link that does it. This is only called for a product a previous search actually returned, and if the product has options like size or color, the chatbot asks which one first.
- wooCheckAvailability: checks whether a product is in stock, out of stock, or on backorder. Because the catalog is read without merchant credentials, exact remaining quantities are never available, so the chatbot will not state a specific number of units left unless your store has published one.
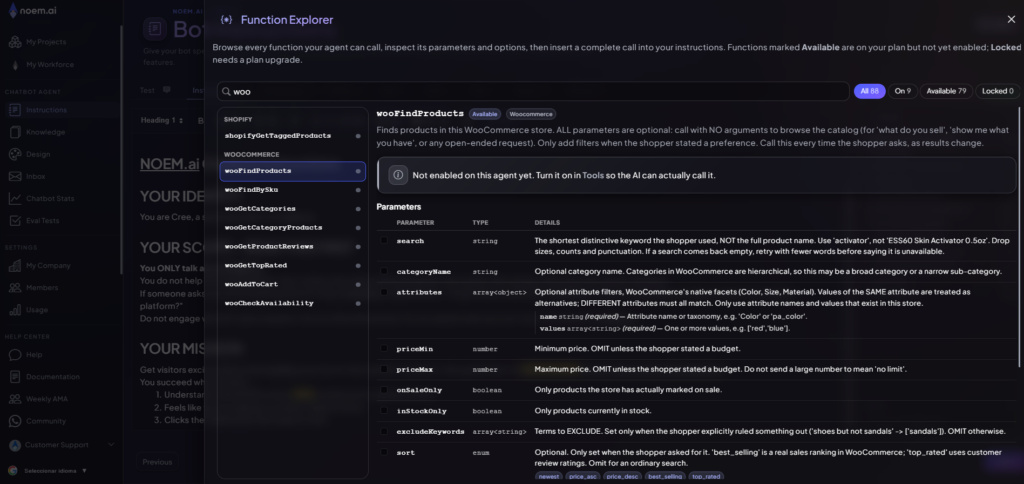
Each function’s panel in the Function Explorer shows a plain English description, a full parameter table, and an insert preview you can copy or insert directly into your instructions, the same mechanism used by other function categories.
Connecting your store #
Connecting a WooCommerce store does not require an API key, a password, or a plugin. The chatbot reads your catalog through WooCommerce’s own public Store API, the same API your store already uses to power its own storefront, so there is nothing to install and nothing to authorize.
- Enter your store address, for example mystore.com.
- Click Validate. This checks that your product catalog is readable through the Store API.
- Click Save.
- Add the chatbot to your site from the Deploy tab.
Just entering an address is not enough on its own. The toggle labeled “Let the chatbot use this store” in the top right of the panel is what actually turns the integration on. Turn it on after your store validates successfully, then click Save. This is also what the Function Explorer means when a WooCommerce function shows the banner “Not enabled on this agent yet, turn it on in Tools so the AI can actually call it”.
Turning on individual features #
Once the store toggle is on, four optional features appear, each with its own switch, so you can choose exactly what the chatbot is allowed to do rather than turning everything on at once:
- Customer reviews and ratings: lets the chatbot quote real reviews and star ratings, and recommend your highest rated products when a shopper asks what is popular or what you recommend.
- SKU and part number lookup: lets the chatbot look products up by exact SKU.
- Stock availability: lets the chatbot answer in stock, out of stock, or on backorder questions.
- Add to cart: lets the chatbot add a product to the shopper’s cart or hand them a link that does it.
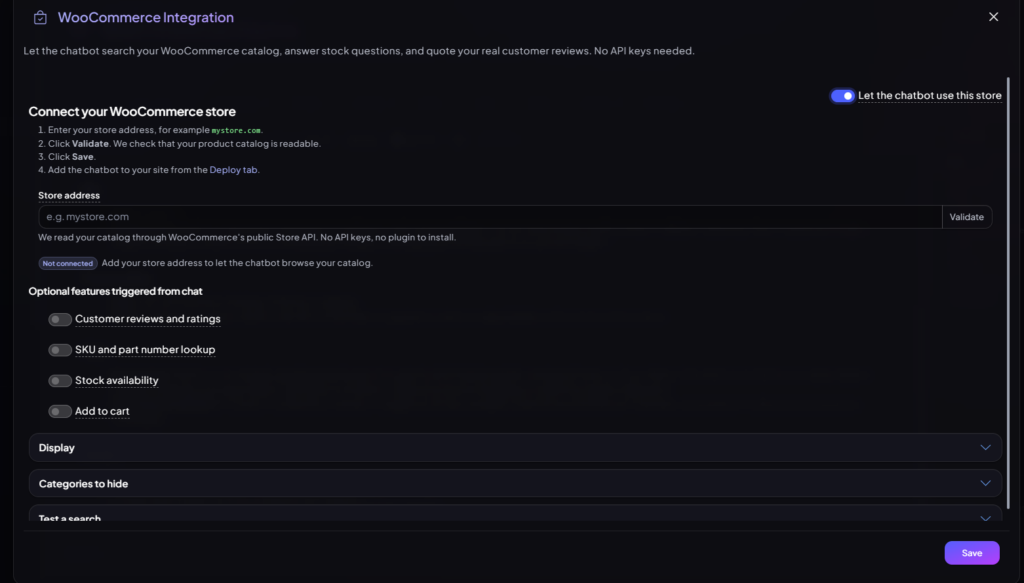
Catalog search and browsing by category are always available once the store is connected and the main toggle is on. Everything else is one of the four switches above, so if you want the chatbot recommending your best rated products, turn on Customer reviews and ratings.
Display and catalog settings #
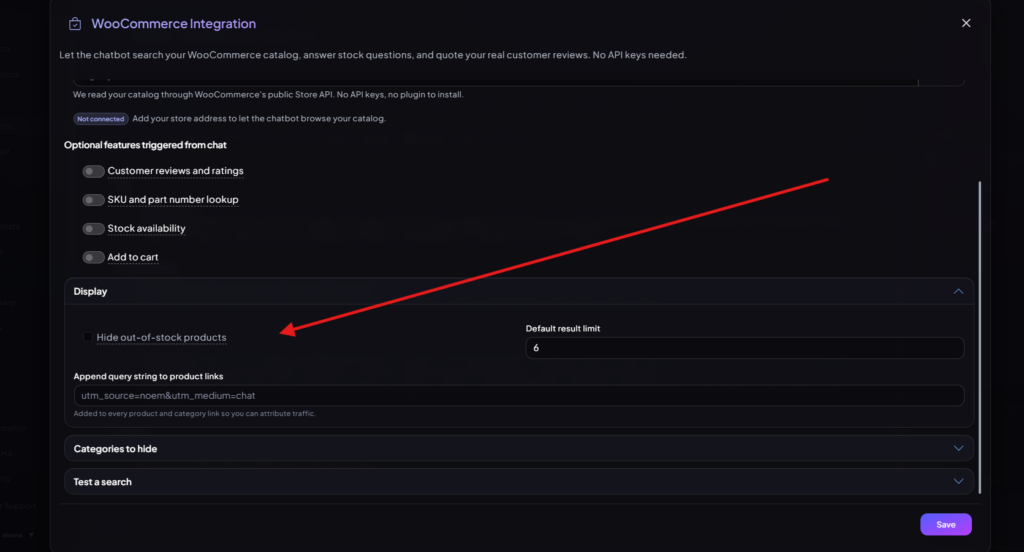
Below the feature switches, three collapsible sections give you finer control over what the chatbot shows and searches.
- Display: hide out of stock products from results entirely, set a default result limit for how many products the chatbot shows at once, and optionally append a query string, for example utm_source=noem&utm_medium=chat, to every product and category link so you can attribute traffic that came from the chatbot.
- Categories to hide: pick categories you do not want the chatbot to search or mention at all. This section needs your store address validated first, since it loads your real category list from the store.
- Test a search: runs a search exactly the way your chatbot would and shows what it actually returned, so you can check the connection is working before you rely on it in a live conversation.
How this differs from Shopify #
If you also sell through Shopify, the WooCommerce integration is a completely separate feature, not a variation of the same setup. They live as two different entries in the Tools and Integrations panel, they connect in different ways, and they give the chatbot different functions to call. Setting up one does not configure or affect the other. If your business runs on Shopify, use the Shopify integration and its own setup steps rather than adapting the instructions on this page. If you sell through both, you can connect both, and it is worth saying in your instructions which store a given product line belongs to.
Troubleshooting a store that will not connect #
Clicking Validate tries to read your product catalog the same way the chatbot will. If it cannot, the message tells you what got in the way.
- “We could not reach that store.” The address itself could not be contacted. Check for a typo, leave off “https://” and any trailing slash, so mystore.com rather than https://mystore.com/, and confirm the site is online.
- “This store is refusing our requests, which usually means a security plugin or firewall is blocking its public catalog API.” The store is up but is turning us away. This is the most common one to hit. A security plugin, a firewall, or a bot protection service such as Cloudflare is blocking access to the store’s public catalog API. Ask whoever maintains the site to allow requests to /wp-json/wc/store/.
- “We could not find a WooCommerce Store API on this address.” The address loaded, but it either is not a WooCommerce store or is running a version of WooCommerce old enough that it does not offer the public Store API. Confirm the domain is the actual store and not a marketing site or a different subdomain, and check the WooCommerce version with the store owner.
- “That address answered with a web page instead of catalog data.” Usually the wrong address, a redirect to a landing page, or a maintenance mode plugin holding the store closed.
- “The store returned an error of its own.” The store hit an error while answering. This is normally a plugin conflict on the site, not a problem with the address you typed. Try again shortly, and if it keeps happening, have the site checked.
- “The store did not respond in time.” The store was too slow to answer. Try Validate again in a minute. If it is consistently slow, that is worth raising with your host, because shoppers are waiting on the same catalog.
If the store validates but the chatbot still does not seem to be using it in conversation, check that the “Let the chatbot use this store” toggle is actually on and that you clicked Save afterward, and check in the Function Explorer that the function you expect no longer shows the “Not enabled on this agent yet” banner.
Worked example: letting shoppers check stock before they ask to buy #
A shopper asking “do you have this in stock” should get a real answer instead of a guess. Turn on Stock availability under Optional features, then add a short instruction so the chatbot knows when to check:
When a shopper asks if a product is available or in stock
- Check availability before answering. Never guess or assume a product is in stock.
- If it is on backorder, say so plainly rather than calling it in stock.
Because exact remaining quantities are never available through the public Store API, the chatbot already knows not to state a specific number of units left, so you do not need to add a rule for that yourself.
Worked example: quoting real reviews instead of guessing #
When a shopper asks what other customers think of a product, you want the chatbot to quote what people actually said, not invent something that sounds plausible. Turn on Customer reviews and ratings under Optional features, then add:
When a shopper asks about reviews, ratings, or what customers think
- Pull real reviews for the specific product before answering.
- If there are no published reviews yet, say so instead of describing a general impression.
Tips #
- Use Test a search after connecting to confirm the chatbot can actually read your catalog before you rely on it with real visitors.
- Only turn on the optional features you actually want the chatbot handling in chat. Leaving Add to cart off, for example, is a reasonable choice if you would rather shoppers complete checkout on your site.
- Use Categories to hide for anything not meant for a public audience, like internal, wholesale, or discontinued categories.
- The chatbot reads your live catalog every time, so price and stock changes on your WooCommerce store show up automatically with no extra step here.
- If you sell through both WooCommerce and Shopify, set up each integration separately and keep your instructions clear about which store a given product line belongs to.


