Overview
You can embed your Noem AI chatbot directly inside a specific section or container on your website—rather than using the default floating widget. This method gives you full control over the chatbot’s placement, allowing you to display it within a div, sidebar, or custom component.
Applies to: All plans with Web Integration access
Platform: Any website or web application supporting HTML/JavaScript
Why Use Embedded Mode
- Custom placement: Display the chatbot inside a specific section of your layout.
- Flexible design: Embed it in modals, dashboards, or side panels.
- Personalized experience: Pass optional user data to create context-aware interactions.
- No external widget UI: Fully integrates with your existing design.
Setup Instructions #
- Identify the section of your webpage where you want to embed the chatbot.
For example, create a<div>container with a unique ID:<div id="chatbot-container"></div> - Copy and paste the following script into your site’s HTML, just before the closing
</body>tag:<script> document.addEventListener('DOMContentLoaded', ()=>{ let options = { // Replace ELEMENT_ID with the id of the div where you want to embed the chatbot chatContainerOverride: 'chatbot-container' }; let currentUserProfile = { // Optionally pass user profile info if available displayName: 'Guest User', // user's name email: '', // user's email profilePic: '' // URL of user's profile picture }; this.chatbot = new window.Chatbot("YOUR_CHATBOT_API_KEY", currentUserProfile, null, options); this.chatbot.init(); }); </script>Replace YOUR_CHATBOT_API_KEY with your bot’s actual API key (found under Noem AI → Deploy → API Key). - Save and publish your changes.
- Reload your site—the chatbot should now appear inside the specified element rather than floating in the corner.
Customize the Embed Container #
You can adjust the embedded chatbot’s dimensions or styling using CSS. For example:
#chatbot-container { width: 100%; height: 600px; border: 1px solid #e0e0e0; border-radius: 8px; overflow: hidden; } This ensures the embedded chatbot displays cleanly within your page design.
Optional: Passing User Information #
If your site has authenticated users, you can pass their profile details to personalize conversations:
let currentUserProfile = { displayName: user.name, email: user.email, profilePic: user.avatarUrl }; This data can be used by your chatbot to tailor its responses or log interactions per user.
Troubleshooting #
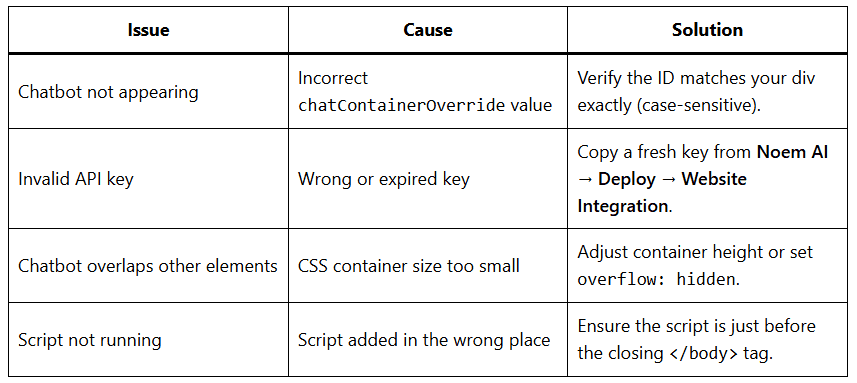
Best Practices #
- Use a descriptive ID (e.g.,
chatbot-support-panel,chatbot-sidebar) for easier maintenance. - Always load the script after the main content to prevent render blocking.
- Pass user data securely—avoid exposing sensitive information in client-side code.
- Use CSS to match your site’s theme and maintain visual consistency.
Next Steps #
- Combine embedded mode with analytics using Google Tag Manager.
- Add conversation triggers via API / Webhook integration.
- Explore multi-page or multi-widget setups for complex web apps.
Related Articles


