
- Overview
- What You Can Build
- Why AI Landing Pages
- When to Use an AI Landing Page
- AI Landing Page vs Hosted Chatbot Page
- Before You Start
- Creating an AI Landing Page
- Adding a Chatbot to the Landing Page
- Customizing Landing Page Sections
- Recommended Page Layouts
- Support Page
- Event Page
- Social Bio Page (Link-in-Bio)
- Best Practices
- Common Issues
- Final Thoughts
Overview #
AI Landing Pages — also called link-in-bio pages — let you create a lightweight, mobile-friendly landing page in Noem.ai and add one of your existing chatbots directly into the page.
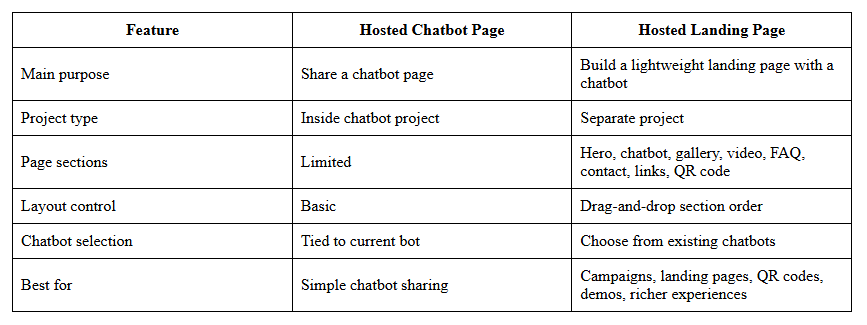
This is different from the older hosted chatbot page experience. Instead of publishing only a standalone chatbot page from inside a chatbot project, AI Landing Pages are created as their own project type. You can build a richer page around the chatbot using sections like a hero area, image gallery, video, FAQs, contact form, social links, QR code, and more.
Think of it as a simple landing page builder with a chatbot built in.
Use it when you want a link-in-bio page for your social profiles, a quick campaign page, a QR code destination, a demo page, a support page, or a lightweight AI-powered website without needing WordPress, Wix, Squarespace, or custom development.
What You Can Build #
An AI Landing Page can include more than just a chatbot.
You can add and arrange sections such as:
- navigation menu
- hero section
- embedded chatbot
- floating chatbot button
- social or custom links
- rich text blocks
- image gallery
- video section
- FAQ section
- contact form
- QR code
You can choose which sections appear, what order they appear in, and which chatbot should be loaded into the page.
This gives you a much more complete landing page experience than a basic chat-only page.
Why AI Landing Pages #
AI Landing Pages were created to make chatbot landing pages easier to manage and more flexible.
Previously, hosted chatbot pages lived inside the chatbot project. That worked for simple use cases, but it could become confusing because the page experience was buried inside the chatbot setup.
With AI Landing Pages, the page becomes its own project. The chatbot becomes one block inside that page.
This is important because it separates two different jobs:
- the chatbot project controls the AI assistant
- the landing page project controls the web page experience
That separation makes it easier to build campaign pages, update layouts, and reuse the same chatbot across different pages.
When to Use an AI Landing Page #
Use an AI Landing Page when you need a public page built around a chatbot.
Good use cases include:
- paid ad landing pages
- QR code pages
- product launch pages
- demo request pages
- event pages
- lead capture pages
- social media bio links
- support or FAQ pages
- simple campaign microsites
- client demo pages
- local business landing pages
For example, instead of sending ad traffic to a full website, you can send visitors to a focused landing page with a hero message, product images, FAQs, and a chatbot that answers questions immediately.
AI Landing Page vs Hosted Chatbot Page #
The older hosted chatbot page was mainly a standalone chat experience.
The new AI Landing Page is more flexible because it can include multiple page sections around the chatbot.
AI Landing Pages are the recommended direction for richer hosted experiences.
Before You Start #
Before creating an AI Landing Page, it helps to have:
- at least one chatbot already created in Noem.ai
- the chatbot tested and published live
- a clear purpose for the landing page
- your headline and subheading
- optional images or video
- optional FAQs
- optional contact form details
- optional social or external links
You can still create the page first and improve it later, but the best pages are built around a clear goal.
Examples of clear goals:
- “Get visitors to book a demo”
- “Answer product questions from a QR code”
- “Capture leads from a Google Ads campaign”
- “Let users ask support questions”
- “Give event attendees a quick assistant”
Creating an AI Landing Page #
Step 1: Create an AI Landing Page Project #
- Log in to Noem.ai.
- Go to My Projects.
- Click New Project.
- Choose the AI Landing Page project type.
- Name the project.
- Save the project.
After the project is created, you can start adding and arranging page sections.
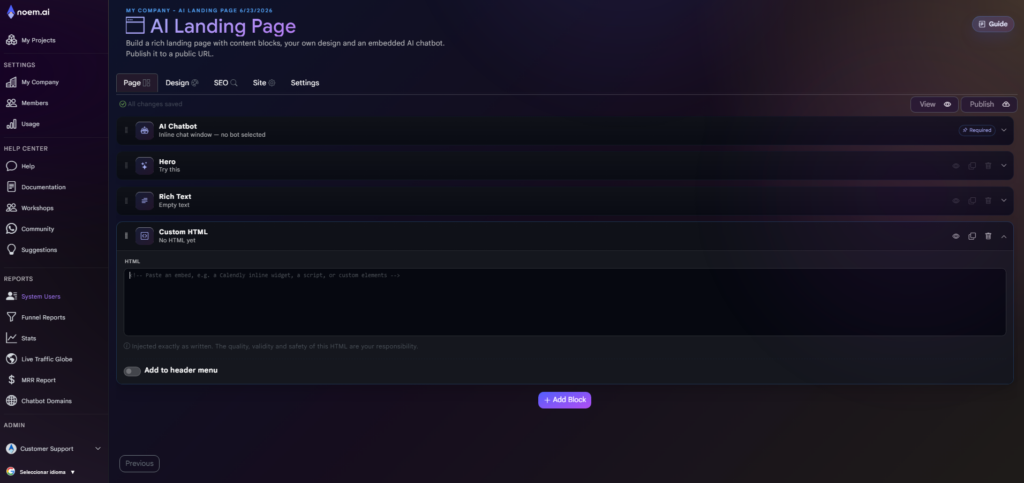
AI Landing Pages are built with sections or blocks.
Step 2: Build Your Page Using Sections #
Each section controls a part of the page. You can add blocks, remove blocks, reorder them, and customize their content.
Common sections include:
- hero section
- chatbot section
- rich text section
- image gallery
- video section
- FAQ section
- contact form
- social links
- QR code
You do not need to use every section. A strong landing page is usually focused and simple.
A good starting layout is:
- Hero section
- Chatbot
- FAQ
- Contact form or links
- QR code, if needed
For product or campaign pages, you may want:
- Hero section
- Image gallery
- Chatbot
- Video
- FAQ
- Contact form
Step 3: Reorder Sections #
You can drag sections to change the page layout.
For example, if the hero section is above the chatbot but you want the chatbot to appear first, drag the chatbot section above the hero section.
After reordering, refresh or preview the page to confirm the layout looks right.
This is useful because different pages need different structures.
Examples:
- A support page may put the chatbot first.
- A campaign page may put the hero section first.
- A product page may put images before the chatbot.
- An event page may put FAQs before the contact form.
The order should match what the visitor needs first.
Adding a Chatbot to the Landing Page #
Step 4: Select the Chatbot #
The chatbot section lets you choose which existing chatbot should appear on the landing page.
Inside the chatbot block:
- Select a chatbot from your existing chatbot projects.
- Choose how the chatbot should appear.
- Decide whether to add it to the page menu.
- Customize the menu label and icon if needed.
- Save the page.
This means one chatbot can be reused across multiple AI Landing Pages, or different landing pages can load different chatbots.
Step 5: Choose Chatbot Display Mode #
You can choose how the chatbot appears on the page.
Embedded Chatbot #
Use embedded mode when you want the chatbot to appear directly as a section inside the landing page.
This is best when the chatbot is the main experience.
Good for:
- support pages
- demo pages
- FAQ assistants
- QR code pages
- guided product selection
Floating Chat Button #
Use the floating button when you want the page content to be primary, while still giving users access to the chatbot.
This is best when the page includes a lot of content, such as a hero section, gallery, video, and FAQs.
Good for:
- campaign landing pages
- product pages
- event pages
- service pages
- mini websites
Step 6: Add the Chatbot to the Menu #
You can choose whether the chatbot section appears in the page menu.
If enabled, visitors can click the menu item to jump directly to the chatbot section.
You can customize:
- menu label
- icon
- whether the menu item appears at all
Example labels:
- Chat
- Ask AI
- Get Help
- Product Assistant
- Book a Demo
- Ask Questions
Use a label that matches the page goal.
Customizing Landing Page Sections #
Hero Section #
The hero section is usually the first section visitors see.
You can customize:
- background image or video
- heading
- subheading
- buttons
- section layout
A good hero section should quickly answer:
- What is this page about?
- Who is it for?
- What should the visitor do next?
Example:
Heading:
Find the Right AI Chatbot for Your Business
Subheading:
Answer a few questions and our AI assistant will guide you to the best next step.
Button:
Start Chat
Keep the hero simple. Do not overload it with too many messages.
Links and Social Section #
You can add links to social media profiles, external pages, booking pages, support pages, or other resources.
Use this section when you want the landing page to act as a simple hub.
Examples:
- YouTube
- Book a Demo
- Contact Us
- View Pricing
- Visit Website
Use only the links that matter. Too many links can distract from the chatbot or main call to action.
Rich Text Section #
The rich text section lets you add formatted page content.
Use it for:
- short explanations
- service descriptions
- campaign copy
- instructions
- disclaimers
- supporting details
Keep rich text focused. If the visitor needs to read several long paragraphs, the page may be too heavy for a landing page.
Good use:
“Use this assistant to ask about our services, pricing approach, support options, or booking availability.”
Image Gallery #
The image gallery lets you display multiple images.
You can use it as:
- a carousel
- a grid
Use carousel when you want a cleaner, compact display.
Use grid when you want visitors to see multiple images at once.
Images can be useful for:
- product photos
- service examples
- portfolio items
- before and after examples
- event photos
- screenshots
- testimonials as graphics
When visitors click an image, it can open for a larger view.
Video Section #
Use the video section when you want to explain something visually.
Good video uses include:
- product demo
- founder introduction
- service explanation
- tutorial
- campaign message
- event overview
- customer walkthrough
Keep the video short and directly related to the page goal.
If the video is the main selling point, place it near the top. If it is supporting content, place it below the hero or chatbot.
FAQ Section #
The FAQ section helps answer common questions before or during the chat experience.
Use FAQs to reduce friction and build trust.
Good FAQ topics include:
- pricing
- how it works
- setup time
- service areas
- refund or cancellation policies
- product availability
- booking process
- support options
FAQs should be short. If an answer is long, use the chatbot to continue the explanation.
Contact Form #
The contact form gives visitors a direct way to reach your team.
Use it when the landing page is meant to capture leads, support requests, bookings, or inquiries.
A good contact form should ask only for what you truly need.
Common fields:
- name
- phone number
- message
- company name
- reason for contact
Avoid asking for sensitive information unless there is a clear and safe reason.
QR Code #
The QR code section helps people open the AI Landing Page from offline or mobile-first experiences.
Use QR codes on:
- flyers
- posters
- business cards
- product packaging
- storefront signs
- menus
- event booths
- printed guides
- vehicles
This is especially useful when you want users to scan and start chatting immediately.
Recommended Page Layouts #
Lead Capture Page #
Best for service businesses, consultants, and agencies.
Recommended layout:
- Hero section
- Chatbot
- FAQs
- Contact form
- Social links
Goal: answer questions and convert visitors into leads.
Product Launch Page #
Best for ecommerce, SaaS, or product campaigns.
Recommended layout:
- Hero section
- Image gallery
- Video
- Chatbot
- FAQs
- Contact or checkout link
Goal: explain the product and let visitors ask buying questions.
Support Page #
Best for customer support and help desk flows.
Recommended layout:
- Chatbot
- FAQs
- Contact form
- Helpful links
Goal: help users get answers quickly.
Event Page #
Best for conferences, workshops, webinars, or local events.
Recommended layout:
- Hero section
- Event details
- FAQ
- Chatbot
- Contact form
- QR code
Goal: answer event questions and guide attendees.
Social Bio Page (Link-in-Bio) #
Best for Instagram, TikTok, LinkedIn, or creator profiles.
Recommended layout:
- Hero section
- Links
- Chatbot
- FAQ
- Contact form
Goal: give followers one simple place to ask questions and take action.
Best Practices #
Start With the Goal #
Do not add sections just because they are available.
Before building the page, decide the main goal:
- capture a lead
- answer support questions
- explain a product
- book a demo
- promote an event
- guide a visitor from a QR code
Every section should support that goal.
Keep the Page Focused #
AI Landing Pages are meant to be lightweight.
A focused page with a strong chatbot and a few useful sections is usually better than a long page with too many blocks.
Put the Chatbot Where It Makes Sense #
If the chatbot is the main experience, place it near the top.
If the page content needs to explain the offer first, place the chatbot after the hero or product section.
If you use the floating button, make sure visitors still understand they can chat.
Use Existing Chatbots Carefully #
Because the landing page loads an existing chatbot, make sure the selected chatbot matches the page.
For example, do not use a general support chatbot on a sales campaign page unless its instructions also support lead qualification.
Match the Menu to the Page #
Only add sections to the menu if they help users navigate.
Good menu labels are short and clear:
- Chat
- FAQ
- Contact
- Gallery
- Demo
- Pricing
Avoid long or vague labels.
Test on Mobile #
Most visitors may open AI Landing Pages from ads, QR codes, or social media. Always test the page on mobile before sharing it publicly.
Check:
- section order
- chatbot visibility
- image gallery behavior
- video playback
- FAQ readability
- contact form usability
- menu navigation
Common Issues #
The wrong chatbot appears #
Open the chatbot section and confirm the selected chatbot is correct.
If you manage several bots, name them clearly so you can identify them easily.
The chatbot is missing from the page #
Check whether the chatbot section was removed or disabled.
If it is embedded, confirm it exists in the page section list.
If it is a floating button, check whether the button is visible and enabled.
A menu item disappeared #
Check whether the section is set to appear in the menu.
If you removed the section from the menu, it may still exist on the page but not appear in the navigation.
The image gallery is not displaying the way expected #
Check whether the gallery is set to carousel or grid.
If you recently changed the setting, refresh the preview.
The page feels too long #
Remove sections that do not support the main goal.
A hosted landing page should usually be direct and focused.
Changes are not showing #
Refresh the preview or open the page in a new browser tab.
If the page has a publish step, make sure the latest version is published.
Final Thoughts #
AI Landing Pages give you a simple way to build a richer public page around a Noem.ai chatbot.
Instead of sending users to a plain chat page, you can create a focused landing experience with a hero section, chatbot, links, images, video, FAQs, contact form, and QR code.
The most important part is not adding every available block. The key is choosing the right sections, selecting the right chatbot, and arranging the page around the action you want visitors to take.


